Gravy

March 21, 2010

Gravy = 1 part butter + 1 part flour + all the flavor you can stand!

Today I made a crock-pot chicken.  Whenever you cook a whole bird or a large cut of beef or pork, there are plenty of juices left over.  I try to save these juices for use in soups, stews and gravies.

I removed the bird from the pot and deboned the meat.  But all of the juice was still in the pot, I just strained it (so I don’t get large chunks of skin or bone) and did my best to scoop the fat off the top.  Using the juices the next day is optimal because the fat solidifies in the refrigerator and is very easy to just scrape off; but who makes turkey the day before Thanksgiving, for instance? So just get creative or ignore the fact that the liquid is nearly half fat, eek.

But that juice is approximately 100% flavor.  Amazing, I say.  You won’t need chicken broth for chicken soup if you have a cup or so of that goodness.  But gravy is not just flavor you see, it is also texture.  And the perfect texture, for this house at least is a 1:1 ratio of butter to flour.

2 Tablespoons of each butter and flour will make a meals worth of gravy for a small family.  Just melt the 2 T of butter in an omelete pan (or whatever you heat up your spaghetti sauce in) using medium to medium low heat.  Once it is melted add your 2 T of flour, and WHISK!  This is the base for a white sauce but instead of milk or cream, we’ll add that flavor, the meat juices.  Milk does increase the creaminess of the gravy and spices can be added (if your meat wasn’t heavily seasoned), but I tend to just leave it be.  Add as much juice as you want to attain the desired consistency, and that you will have to find out for yourself.  Jacob likes it quite thick so I’ll only add a cup or so of liquid, but I would say 2 is more normal.   This is another kind of food I love because I always have the ingredients on hand.

Homemade Taco Seasoning

February 13, 2010

I grew up on the taco seasoning packets.  You just dump it into your cooked meat and bam, the smell of tacos fills the whole kitchen.  Very convenient, however last night as I was browning the meat I realized two things: 1) I don’t have a packet, and 2) I probably have all the right stuff to make it anyway.  I know I have cumin the main flavor of Mexican food (at least the variation I’m inclined to) and so I decided to find a decent replacement.  Why pay for stuff I already have in my home?  And it was easy to get it together while the meat was browning.

Ingredients:

  • 2 t dehydrated onion (or heaping 1/2 t of onion powder – 1:3 ratio of powder to flakes)
  • 1 t chili powder
  • 1/2 t red pepper (I didn’t have any so I used cayenne pepper)
  • 1/4 oregano
  • 1 t salt
  • 1/2 t cornstarch
  • 1 t garlic (that jarred minced stuff) (or 1/2 t of garlic powder)
  • 1 t cumin

Directions:

  • mix all the ingredients in a bowl
  • add mixture and 1/2 c of water to cooked meat, simmer for 10 minutes (or so)

Source: The Homesteading Housewife’s recipe

Jacob loved it.  I found it a bit spicy but Jacob didn’t taste any bite at all.  I won’t change a thing about it. Plus, I really like finding uses for my dehydrated onions from the cannery as well as for the jarred minced garlic, both add more flavor, I think, than their powdered counterparts.  You should try making your own, and feel liberated from packets!

Chocolate Chip Muffins

February 10, 2010

My husband sometimes has a hard time waking up in the mornings.  To be honest I sleep through his shower, so I suppose I have a harder time getting up.  But early in the marriage it was important for us to share our mornings (like every other moment of our day) so we would get up together, I would pack lunches and get breakfast together while Jacob got ready for work.

Things haven’t changed much, except that we really tired of boxed cereal.  So we tried other things like eggs, oatmeal, bagels, and muffins.  I think we really like the convenience aspect of the latter two.  Jacob can grab his lunch and breakfast and eat them on his way or when he gets to work.  Yes we loose a bit of together time in the mornings but we agree that we get more out of our evenings together and if he leaves early he can get home earlier.

Back in August, when we were road-tripping through Pennsylvania we picked up a giant muffin tin.  It makes 6 muffins.  This doesn’t quite get us through the week but we don’t want to eat the same thing everyday anyway.  Be warned these muffins are more than one meal.  They are huge and we both usually break up our breakfast muffin into a 6:30 am meal and a 9:30ish snack.

We are still experimenting with recipes, they don’t all translate well from regular muffin size to giant size.  I think more structure (i.e. dry ingredients like flour and oats) and additional leavening (baking powder etc) are necessary.

We have tried a variety of recipes but haven’t had much luck.  This week we made some chocolate chip muffins.  They were really good! So here’s the recipe.

Ingredients:

  • 3 cups bleached all-purpose flour (I never use straight white flour)
  • 2¾ teaspoons baking powder
  • ¼ teaspoon baking soda
  • ½ teaspoon salt
  • 2 cups semisweet chocolate chips (this was way too many!)
  • 12 tablespoons (1½ sticks) unsalted butter, softened
  • ½ cup granulated sugar
  • ½ cup firmly packed light brown sugar
  • 2½ teaspoons vanilla extract
  • 3 large eggs
  • 1 cup milk

Directions:

  • Combine the flour, baking powder, baking soda, and salt in a small bowl.  (Feel free to go wild with your 3 cups.  I keep oats, wheat bran, wheat flour, and flax around and I am never shy to substitute parts of the flour amount with any of these.  I think this time I used about 2/3 a cups of wheat bran with a few table spoons of flax.  This always gives body and flavor to the baked good)
  • Toss the chocolate chips with a tablespoon of the dry ingredients.  I have no idea what this does but Jacob liked the results (not that we have anything to compare to, I forgot to run a control experiment).  Remember to cut the chocolate if this is not a treat but a meal, 1/3 cup of chocolate per muffin is quite a lot!
  • Mix the sugar and butter, by hand or mixer.  Add the vanilla extract and add the eggs one at a time.  Whip or beat until well mixed.
  • Alternately add the dry ingredients and milk.  3 additions of the former and 2 of the latter (i.e. dry, milk, dry, milk, dry).  This mixes everything consistently.  And remember to scrape those sides.
  • Finally, toss in the chocolate.
  • Evenly distribute batter into lined muffin tin.
  • Bake the muffins at 375˚F for 30 minutes, or until risen, set and a toothpick inserted into the center of each muffin withdraws clean. It’ll be hard to tell with all the chocolate but look for gooey light colored stuff and ignore the dark.
  • Enjoy muffins for days on end!!

Mild Jambalaya

October 1, 2009

I love kielbasa.  I’m like half-Polish, so I blame it on that.  Also, game day meals at my parents house always consisted of this awesome meat on sub sandwiches, at least until Roethlis-burgers were invented!

I still love this meat, however it is new and different to my new husband.  A sandwich of only this meat is too foreign for him just yet.  So our current favorite way of enjoying my favorite meat is in Jambalaya!  But, if you know me you know I need a class of water when I walk past cajun seasoning; I just do not like spicy food.  So this idea would seem counterproductive. However, I found a really nice, calm/mellow recipe that we just love.

We started with using a box-rice dinner that I just had to add the meat too.  But with a bit of extra chopping, I get some (real) vegetables and a spice combination that I control, which is crucial for this genre of food.

The original recipe was submitted to allrecipes by Grant Michael.

  • 2 t olive oil
  • 1-2 cup chicken, cut into bite-size pieces
  • 1/2 lb kielbasa, diced
  • 1 onion, diced
  • 1 green bell pepper, diced
  • 1/2 cup diced celery
  • 1 t garlic powder
  • 1/4 t cayenne pepper
  • 1/2 t onion powder
  • dash of salt and ground black pepper
  • 2 cups uncooked white rice
  • 4 cups chicken stock
  • 3 bay leaves
  • 2 t Worcestershire sauce
  • 1 t hot pepper sauce

Saute first set of ingredients until onion is translucent (a few minutes). Then toss in rice and broth/stock and bay leaves.  Bring to boil, reduce heat for simmer, continue simmer for 25 minutes (that’s how long I cook all of my rice, it is always perfect).  Stir in sauces before serving.

I ususally have cooked chicken in my freezer and kielbasa is already cooked, so I just saute the vegetables with their spices for a few minutes, maybe toss the meat at the end with it all to heat it up (but the meat warms up in boiling water just fine).  But bite-size is the best way to cook up a couple chicken breasts quickly.  We used this amazing kielbasa that we found at our local warehouse store which had plenty of kick all in itself.

I actually left out the hot sauce (mainly because we don’t own any and I couldn’t see using it on other things) and it was still amazing.  Well, for me.  I would not recommend leaving this part out for the majority of families.  But it helps for picky eaters and can be added on a plate by plate basis.

Some possible yummy additions include: red beans, shrimp, Cajun seasoning, or a can of diced tomatoes.

Immediate Food Storage

July 7, 2009

Jacob and I have been meaning to get out to the cannery. We really like being prepared, and although I love our Sam’s membership, they don’t sell beans or wheat.  I talked Jacob into a short 3 month supply because I really didn’t want to move a year’s supply of food (like he wanted), and we have a lot of food stored, stuff we regulary rotate, that could probably help us last for 6 months.  Anyway, Jacob was very excited about the idea that professionals packed our storage so it could actually last the 30 years that is claimed.  I personally do not want to haul around these boxes for 30 years but I think it is wise to have some emergency food.

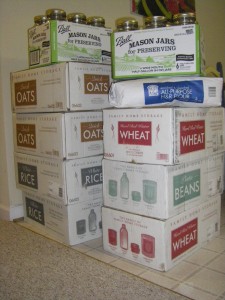
So we bought all this for ~$250:

imgp2415

The boxes constitute the minimum food necessary for 2 people for 3 months, the flour is just an add-on we needed.  I must admit, I’m happy we have them.  But I am also excited to start stocking up on some things that will make life pleasant for those three months, not just bearable.  I mean we do have things to make bread, necessity but also yummy, and cookies, 72+ oz of chocolate chips, I think some more tomatos and sauce to go with our pasta, and some variety in vegetables, past canned peas, corn and green beans, but it’s a good start, eh?

It was a cost that was hard to swallow but it was definitely cheaper that we spend on even 2 months of food, and it gives a feeling of preparation.  And although we did jump in with food storage, it was not our first time near the “water”, we’ve been buying extras of canned goods since before we were married and we did not go into debt just to gather these things we came to feel were necessities.

Although they were a bit too tall to fit under our bed, we found a home for them under my hugely tall craft table, yay!  We use the half gallon mason jars to store the flour we got from Sam’s.  It is perfect for our bread flour because the jar holds exactly what I use to make bread, amazing.

I’m really working hard to incorporate beans into our every day diet.  Yesterday we put a can of kidney beans, warmed, on our taco salads.  Oh they were so yummy!  I’m really struggling with trying to figure out what to do with beans!  I love chili and I have enjoyed making Cajun Red Beans Lite (I’m not the hugest fan of spicy).  But what else to do with them?  I still need to do some research.  Everyone talks about puting them on salads but beans cold, that does not sound appealing to Jacob and I.  I don’t mind cooking them with some meat and onions, maybe making a bit of soup.  But I’ll have to see if I can find some more ideas.  I loved the warm beans on the salad though!

Oh and btw, popped wheatberries do not equal popped corn kernals. >.<

Pizza Dough

July 4, 2009

Jacob and I love making our own pizza.  I started making it with my normal bread recipe, with dough that was left over because 2 people do no need 3 loaves of bread everytime.  But he was unhappy with the texture so I went searching for a good one.  We love the idea of the no-rise pizza dough, as we are both pretty impatient, especially Jacob and if I’m lucky enough to get him in the kitchen I want to keep him there!  I found the recipe here, but it makes two pizzas for us, so here is the “half recipe” or the recipe for one pizza pie dough.

Ingredients:

  • 1/2 T yeast
  • 3/4 C water
  • 1 T sugar
  • 1 1/2 T oil
  • 1 1/2 – 2 1/2 C flour (it’s always an estimate, especially when adding in wheat flour).

Proof the yeast in warm water with some sugar for energy.  Add the oil, then mix in enough flour for the dough to not be sticky, like any bread.  Then knead the dough until it is smooth.  One might let it rest for a bit, but we just roll it right out on our counter then transfer it to a corn-mealed pizza stone.  Top with favorite toppings. Bake at 375 F for 20-25 minutes.

One awesome thing about breads is that ingredients are always on hand (at least in my house).  The toppings are where a shopping trip might be in order…or not.  One day I made dough, just to realize that we were out of mozzarella cheese, oh no!  But we always have a 2 lbs block of cheddar sitting in the fridge, yeah we love that cheese.  I was so worried it would ruin our dinner, having that yellow mess on our pizza, but it turns out using what you have can lead to great discoveries.  Cheddar, Ham, and Pepperoni are our new favorite toppings.  Jacob never liked ham on a pizza without pineapple but he is now converted!  Be sure to experiment explore and toss some veggies on there too.

Butter Pound Cake

April 1, 2009

Butter pound cake is a cherished tradition in my house.  My mom absolutely loves buttery desserts.  She also raises chickens so the 6 egg requirement is a bit easier to swallow.  I’ve always loved fresh strawberries and these two are such a perfect pair.

Last night the stars aligned.  My parents had just brought us fresh eggs, we had left over heavy cream from an meal earlier this week, and I wanted fresh strawberries.  Late in the evening we threw this cake together and ran out in search of fresh strawberries while it baked.

This is an amazingly simple recipe; it is brilliant.  The eggs give it such weight and the cake comes out with the perfect crusty outside and the deliciously yellow spongey inside.

So it is not exactly a “pound” cake, with a pound of everything.  But what I love about this recipe is that it is not too much cake.  Well and not being a traditional baker, I do not have many special pans.  This cake is made in a 9″x13″ casserole dish.  Ours was extracted from the glass dish without need for butter or flour lining, but it is suggested to do both.

Ingredients:

  • 1/2 lb (2 sticks) butter at room temperature (please for all things good, do not substitute margarine here)
  • 3 C sugar
  • 3 C all-purpose flour (sifted, then measured)
  • 1/2 pint heavy whipping cream
  • 6 eggs

Cream the first two ingredients.  Then add the remaining ingredients in order.  I scrambled my eggs a bit before adding to the mixture so that I could mix them in faster.  Bake it 325 degrees for 1 hour and 15 minutes.

Our did not take the entire time (only about 1 hour) so I would start toothpick checking it around 50 minutes.  We ate it with fresh strawberries and the remainder of our pint of heavy cream whipped with some sugar into a fluffy topping.

imgp2090

The cake would be great by itself or with some ice cream or any other fresh fruit, expecially peaches.  I wonder what else it could be good with?

Holy Scrumptious Lasagna, Jacob-atman

March 31, 2009

Since the two of us were married, partner meal planning did not occur without Jacob suggesting lasagna.  So, I felt his birthday would be a perfect time to whip up a bit of his favorite pasta.  I really like the format of Cooking for Engineers for recipes in general.  My favorite from their recipe collection is the lasagna and their chicken pot pie. I followed their directions pretty closely.  However

Ingredients for meat sauce:

  • 1 T olive oil
  • 1 onion
  • 1 1/2 t granulated garlic (or 6 cloves of garlic)
  • 1 lb ground beef
  • 1/2 t each salt and pepper
  • 1/4 C heavy cream
  • 28 oz puree tomatoes
  • 2 14.5 oz of diced tomatoes

Cook onion in oil.  Add the granulated garlic right before adding the meat.  Then brown the meat and season with salt and pepper.  Add the cream and allow to warm.  Add tomatoes, then allow to simmer for a few minutes.  (A lid is preferable so that now you can work on the cheese filling).

Ingredients for cheese filling:

  • 15 oz Ricotta cheese
  • 1/2 to 1 c of Parmesan cheese (I’m sure the fresher this is, more would be better)
  • 1/4 C basil leaves (I don’t like too much salad crunchiness in my lasagna so I reduced this to 1/4 C)
  • 1 beaten egg
  • 1/2 t each salt and pepper

Mix all ingredients until smooth.  Pretty simple huh?

Remaining Ingredients:

  • 16 oz Mozzarella, shredded.  (We just bought block and shredded it ourselves, probably the best way to go with most of these ingredients)
  • 12 oven-ready lasagna pasta pieces (one box, in most cases)

Now lay out the pasta, and top each with the ricotta mixture.  This makes it easier to evenly distribute the cheese filling.

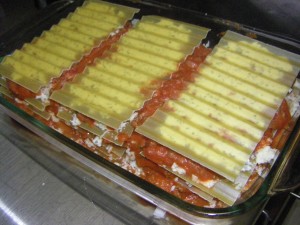
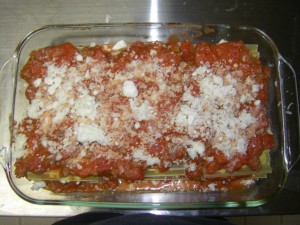
In the bottom of a 9″x13″ casserole dish place a bit of sauce, just to keep the pasta from sticking/burning. Lay three pasta/cheese pieces in, pasta on the bottom.  Top the layer with mozzarella and then sauce.  Repeat twice: pasta/cheese, mozzarella, sauce. But with the last three turn them upside down and place the pasta on top of the cheese.  Top this with the last of the sauce and then the end of the cheese.

imgp2015

There is an awesome diagram of the layers at the end of the CfE recipe.  One important factor is to try to keep things even.  I put my shredded cheese in a measuring cup and divided it into 4 portions.  The sauce can be more eye-balled but pay attention!

This meal was amazing.  Jacob really enjoyed it.  We ate it for like a week as leftovers.  And with a base like this the recipe can be modified to your tastes, like more mozzarella, more herbs in the sauce maybe, or different meats, or no meats at all and some more vegetables.

imgp2016

This may take a while to understand, find the ingredients, and put together, but let me tell you.  It is worth it!

Slow-cooked Roast

March 15, 2009

Sundays can feel very long sometimes.  Our church’s services last three hours each Sunday.  We try to eat lunch right before but we just cannot help being hungry when we get home.  Jacob has always been quite impatient for food, and this is exacerbated on Sundays.   So, our favorite meals on the wonderful Sabbath day are meals that are ready when we get home.  Right now for us that means crock pot meals.  Our two favorites currently are from his mother’s kitchen, chili and pot roast.  I’ve always made pot roast in the oven but Jacob and I have perfected the art (or are at least headed there) of slow-cooked chuck roast.

Ingredients:

  • 1 to 3 lbs chuck roast
  • 3-5 red potatoes chopped to large bite sizes
  • 3-5 carrots chopped to about same size
  • 1 onion microwaved for 5-6 minutes (not burning or melting)
  • 1 can of cream of mushroom soup

High for 6 hours or Low for 11-12

We put it on High from about 10 or 11 until 4:30-5.  There is plenty of room for timing with a slow cooker; we usually can just put it on our plates when we get home.  Please be sure to check the temperature with a meat thermometer before chowing down, just in case.

To prepare the pot, we place the meat in first, and place the potatoes and carrots on opposite sides of the roast, while the onion is microwaving.  Then top the meat with the onions and soup.

This past time we dressed up the meal with gravy.  I took the juices from the pot, the moisture released from the roast and the soup that was free and not coating the meat or vegetables, and put them in a warmed frying pan.  I whisked the juices as I added flour, giving the flour enough time to cook a bit and thicken the gravy.  Amazing topping.  This meal is also served great on top of rice, and as usual, this helps it go further.

Sam’s Club Membership

March 14, 2009

Jacob has always been set on getting a membership to one of the nearby HUGE stores.  I really feel they have no other name, they are huge, everything they sell is huge, you get the picture.  So early in our marriage, before school started, I went shopping, price shopping.  I walked all over both Sam’s and CostCo, we have both in the same main shopping area 30 minutes away, and wrote down the prices of the things we could possibly want. This is a very important part, you cannot forget to do this at the store you normally shop at as well, which for our non-fresh food happens to be walmart.

After price comparing, and having a bad experience at Costco, we bought our Sam’s club membership.  Online we saw they had a wonderful reward for students wanting a membership: $15 gift card.  Sweet.  That made the price the same for a CostCo or Sam’s membership and I feel more comfortable at Sam’s, and they sell cheap gas there for Jacob.  But when we bought the membership the lady claimed they just stopped doing the student membership.  We bought it anyway, but Jacob complained to corporate because their website was then wrong.  And they said just go back in and we will fix it.  We got our gift card from Sam’s for being a student, and they had another, newer offer and gave us the money for both of them.  Therefore, we only had to save about $10 this year to pay for the extra membership expense.

We really love our membership.  Jacob stops there on the way home from work for gas.  I love buying my meat, cheese, milk, and cereal there.  Those are our best finds.

We eat a lot of meat for two people so this was an important thing to look at, Sams for some reason has the most reasonable meat.  Ground Lean Beef (90/10), which is the kind we perfer, is found there cheaper than the Walmart 85/15.  And as we have found out on another trip we can get about-to-expire meat even cheaper at Sam’s too.

Dairy is something else we fly through.  We eat cold cereal nearly every morning for breakfast, sometimes I switch it up for Jacob and make him eggs.  We discovered the name brand milk (2% is around $2.30) for a whole dollar cheaper than the Walmart brand, and sometimes milk is found closer to four dollars! We also lover our cheddar.  They sell the big 2 lb blocks for a fraction of the unit price found elsewhere.  And with cheddar you can make it last longer in the freezer, if you don’t think you can use the entire block soon.

Cereal can be up to 10 cents less per oz.  One draw back is you have to buy two bags at once of any given cereal.  But we go through cereal so fast we do not mind.  Frosted Mini Wheats, Life, and Honey Nut Cheerios are some of our favorites.  And you just rotate which one you use, unless it is life which both bags get used before a different kind is opened!

We manage to find other ways to save money, buying a huge 25 lbs bag of flour for the price of only two 5 lbs bags.  Or buying spaghetti sauce in three packs to save a few cents per unit as well as stock up on some food storage.

A few words of warning that we have run into:

  • Check the use by date, always! Can you really eat 12 packages of saltines in 2 months?  Some items have great dates, but it really depends on your situation and affinity for the product.
  • Some things are not a deal.  This is especially true if you are an avid coupon clipper.  Fruit in winter is not very cheap at Sam’s and can usually be found cheaper elsewhere.  In general, check your prices on a regular basis, or at least a seasonal basis.
  • Here today, gone tomorrow.  Do not depend on what the store will have in stock.  Each Sam’s get different deals and they all have rotating inventory.  And every time I’ve been in there I’ve heard at least 2 people say to their spouse/shopping buddy, “They move stuff around every time I come here, I can never find anything.”  I haven’t personally had that problem, but apparently others have.

Maybe a membership could be right for you, it truely depends on your circumstances, it might make more sense if you have 4 kids than if it is just the two of you.  But I love not having to go meat shopping every week, because we keep a month’s supply in the freezer.  It is definitely worth a look.